25 settembre 2011

Needing bread

 
When I was a kid I was intolerant to wheat so I never got used to eating much bread at all,
even though I really missed eating everything else (specially pasta and cakes) it was probably because the bread was never good enough to be desired as much!

Its happened to all of of us once in a while to taste bread that you just cant keep your hands off, you keep on munching on small crunchy bits of crust and soft crumb with that yeasty acidic flavour. Seeds, grains and different texture of wheats can make it seem so diffrent from what we are used to eating every day. Mind you, the sandwich bread is not at all popular in Italy and around Rome the best bread you can buy comes from Lariano and its half and half wholegrain and cooked in a woodoven.
But...mine is best!
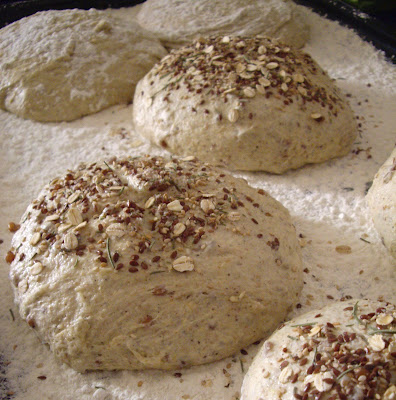
I started making home baked bread last year when my mother came back from Venice with a friend's recipe, she told me he made the most delicious bread so I tried it.
It was true!! It was the most fragrant crusty crust I have ever made!
Working in restaurants I have often made bread , but they all require the kind of precise boring white or slightly decorated bread, not the rustic slabs that I like so much!
This is the recipe, that with a bit of a heart throb I put on this blog, its easy and it makes about 5-6 loaves, that can be cut in halves and frozen for future use.

Pane fatto in casa di Alfredo

Ingredients:
1 kg durum wheat flour (the one used for making pasta)
500 g whole meal flour, spelt or rye flour, I often mix depending on what flours I have left.
80 gr mashed potato ( I've often used the dehidrated one in a bag, but the real things is best)
2/4 Tbsp olive oil
45 gr raw sea salt
12,5 gr fresh yeast
1 good Tbsp malt (sugar can also be used, it usefull for activating the yeast but not necessary)
1,5 l warm water (it is essential that the water is warm NOT hot, say around 18°c otherwise the yeast will die!)

In a big bowl (it must be big enough for everything), pour 1 litre of water in and stir the malt in it. Then add the yeast and stir it with a whip until its all dissolved.
Pour the oil in and the mashed potato.
Now we can start with the flours, first the durum flour, mixing with a wooden spoon, then the rest. If the mixture becomes a little too dry add some water. The total amount of water needed depends on many things, including the temperature and humidity of our kitchen and our oven.
And dont forget the salt, add it as soon as you're adding the flours.
We need to work on the dough as we add the flours and water, probably with our hands until it seems all incorporated.
Now we can we can roll the dough on a floured surface and knead it properly, or just let it rest in the bowl (as long as its smooth and not lumpy), it must be covered with a damp cloth or a plastic bag and left to rise in a warm place. The gluten in the flours will blend properly and it will do the job for us!
The amount of time for the dough to rise depends on us, from a minimum of 2 to 3 hours, to 9 or 10 hours, anyhow the dough needs to double in size. Sometimes I make my dough in the evening and leave it overnight, so that it is ready for cooking the morning after, just in time for breakfast.

Turn the oven on at 160°c, with heat from top and bottom. I often put a pyrex bowl of boiling water in the lower part of the oven to keep the humidity high.
Now we need a cooking tray, quite a big one to fit the bread loves, and flour it with a good millimiter of flour.
With wet hands we need to cut 5-6 pieces of dough and arrange them on the tray, its important to place them well as they musn't be handled too much. If they seem too close its not a problem, when the bread is cooked they can be easily divided.
Now sprinkle the loaves with more flour and bake for about an 1:30 hours
As all ovens are different I suggest you keep an eye on the loaves as they cook, I ususally cook the bread at 140°c because my oven tends to burn the bottom of everything!
When it looks done turn off the oven but leave the bread in for another 10-20 minutes.

Now take it out, divide the loaves and, if possible, wait another half hour before cutting it.
By now the aroma will have filled your house and the salivation will be unbearable!!
Enjoy it with butter and vegemite, cheese or marmalade, and remember that when you start making bread you will never stop!!

07 settembre 2011

nuovi sapori di una volta, i getti cucurbitacei

                                i getti delle zucchine


i getti delle zucchine non si trovano al mercato, non sono comuni ortaggi da gonfiare e vendere a prezzi stracciati, sono una primizia di quelle che si godevano una volta, quando si aveva un occhio di riguardo agli sprechi e con poco ci si alimentava.
Insomma si può ben dire che sono una delizia, sono di una tale bontà che chi le ha non te le darebbe mai!!

ma se avete la fortuna di non aver ancora levato le piante delle zucchine o magari quelle del vicino che non sa cosa farsene provatele.  Sono noiose da pulire ma facili da cucinare e di un gusto tutto loro!

Bisogna innanzitutto selezionare i getti nuovi, assieme alle foglie. Saranno coperti di peluria, quindi vanno sezionati, spelati e affettati in lungo, poi immersi in acqua fredda per farli arricciare proprio come il sedano. Foglie, steli, getti nuovi, e le piccole zucchine che non si sono mai formate.

A questo punto si possono cucinare in diversi modi, sempre legati alla tradizione locale. Alcuni dicono di sbollentarli e ripassarli in padella, magari con aglio, peperoncino e alici.
La signora che qui me li ha preparati, la signora Lella, li ha fatti direttamente cotti in tegame con aglio olio, peperoncino e pomodoretto fresco.


Visto che le zucchine non hanno vita lunga, e noi non sapevamo che gli ortolani ne piantano a cicli, così da assicurarsi un'estate di zucchine, ci siamo presto dati a raccogliere e provare la stessa cosa con i getti della pianta della zucca, che tra l'altro è veramente un pochino troppo tardiva (dopo qualche tentativo abortivo, l'unica vera promettente è ancora  poco più grande di una palla da tennis!!).
Abbiam raccolto i getti nuovi, con foglie e steli, eliminati se troppo fibrosi e velocemente pulita dalla peluria, senza andare troppo oltre, che queste son davvero pelosette. Sbollentato il tutto e ripassato in padella come sopra. Davvero ottime, delicate e acidule.
Si potrebbe benissimo anche aggiungere al minestrone autunnale quindi.

31 agosto 2011

Marmellata di sambuco


Il sambuco è uno di quelle piante che amo sterminare, lo so, lo ammetto non è bello quello che ho detto ma intendo dire che è una pianta che cresce troppo veloce rispetto alle altre e, come la robinia, è troppo comune. Ma non taglio mica l'albero, solo i nuovi getti che crescono un pò ovunque. Del resto come potrei tagliare un albero che tra aprile e agosto da tanta gioia?
Per la prima volta quest'anno ho raccolto un gran mazzo di rami stracolmi di bacche rosse per farne marmellata, non ho seguito nessuna ricetta e ho fatto di testa mia come al solito

1 kg di bacche
600 gr zucchero
1/2 cucchiaino raso di agar-agar in polvere o della pectina per marmellate

Si separano le bacche e si sciacquano veloci, eliminando con cura le bacche ancora verdi.
Poi ho messo a bollire direttamente con lo zucchero, lentamente per circa 15 minuti. Quindi ho sterilizzato i vasetti e ho aggiunto l'agar-agar alla marmellata, continuando a mischiare e cucinare per altri 5 minuti.
Ed ecco che appena addensata è pronta da mettere nei vasetti sterilizzati.

Ma attenzione al consumo di questa marmellata, e delle bacche di sambuco in generale, possono essere fortemente lassative!!
                             

27 luglio 2011

Progetto Orto: i fiori spontanei e la biodiversità

Dopo varie tosature del prato con cui cerchiamo di tenere a bada le erbe troppo infestanti per lasciare spazio alle più piccole e delicate, stiamo notando quanta varietà ci sia in un campo incolto!
Tra le più note e spontanee ci sono

phytolacca americana cicuta o conium maculatum raphanus raphanistrum
o ravanello selvatico
o Raphanus raphanistrumaphanus raphanistrum


la cicuta vista da vicino e la malva


la badana e i suoi fiori


la cicoria con i suoi fiori violetti


un tipo di silene


convulvolo


il galium aparine

24 luglio 2011

Progetto Orto: luglio


Siamo ormai a fine luglio e l'orticello prosegue, è stata dura senza acqua mantenerlo, e alcune piante hanno anche sofferto il caldo intenso e la siccità costanti di giugno e luglio. Ma la soffisfazione è stata grande e l'orto ci da anche i suoi frutti, anche se rallentati rispetto ad un orto fornito di acqua!
Le zucchine sono state continuamente in produzione e i pomodori stanno arrivando, ancora verdi, ma copiosi, le melanzane anch'esse si stanno gonfiando e i fagioli maturano ancora e vengono raccolti man mano (ovviamente deposti in freezer fino a quando non sono abbastanza per esser cucinati). Il nostro sistema di raccolta di acque piovane è stato vano sopratutto per mancanza di pioggia, e al primo grande temporale di luglio hanno ceduto gli occhielli del telo.
Le nostre forze sono andate sopratutto alla raccolta di acqua dalle fontanelle pubbliche. Circa 130 litri d'acqua venivano dati ogni 2-3 giorni alle piante.
Inoltre, sempre a scopo didattico sono state piantate a fine giugno le patate e i ceci che, nonostante la sofferta siccità reggono. Le carote che crescevano sui cumuli a spirale sono state diradate ma sembra che poi soffrono anche loro per mancanza d'acqua.
Tutto però sembra in buone condizioni, solo le melanzane sono state aggredite dalla metacalfa pruinosa che fino ad ora abbiamo solo allontanato con le mani! in un sito ho trovato invece questo rimedio: "per la difesa biologica consiglio un bel misto di olio minerale, estratto di neem e piretro. Funziona soprattutto sulle larve giovani. Sugli adulti fa comunque il suo effetto, perchè l'olio dovrebbe sciogliersi nello strato ceroso e il neem, molto persistente, potrebbe funzionare."
http://www.civiltacontadina.it/